.png)

Asclepius Beanie
- Apr 4, 2025
- 8 min read

Read the Story:
Or feel free to skip straight to the pattern.
It won’t hurt my feelings!
Where would we be without the healers in our lives? Doctors, nurses, paramedics, even just a comforting hand of a parent all bring the power of healing to the world. Throughout history healers have been revered for their ability to somehow magically rid us of disease. We’ve passed down stories of their miraculous deeds and even incorporated their symbols into our everyday lives.
The Rod of Asclepius - a serpent-entwined staff - has become a popular symbol for the medical profession. Derived from Greek mythology, this rod was carried by Asclepius, a god of healing, who was half-man, half-serpent. He also happened to be the son of Apollo, who was also a god associated with healing. Any time someone was ill or a city was stricken with plague, prayers and offerings would be made for Asclepius’s divine intervention.
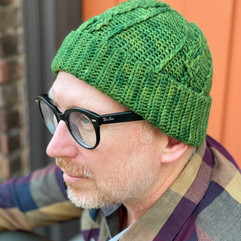
The Asclepius Beanie captures the essence of this healing spirit with the entwined cables climbing to the top. When viewed from above, the cables even form another familiar healing symbol - the cross. As such, this beanie would make a perfect gift for the healer in your life or even a way to bring healing warmth to yourself as you wear it.
Now enjoy the therapeutic act of crocheting up this beautiful beanie!
Feel free to purchase the printable PDF!
Materials & Pattern Information
Yarn | Yarn Dragon Fibers hand-dyed Squishy DK, Alice in Wonderland Collection Green: “To Put it Bluntly, a Weed!”; Blue: “Who. Are. You?” 100% extra fine superwash merino wool CYC 3 (DK) weight, 11 wpi 219yd/3.5oz (200m/100g) per skein (see size chart for quantities needed) Alternative yarns: Kristy's Fiber Arts DK, Viking Fiber Co. Tromso, A Chick That Knitz DK |
Hook | Body: US I/9 (5.5mm) or any hook needed to achieve gauge Ribbing: US H/8 (5mm) Recommended hooks: Furls Odyssey, Furls Streamline Wood, Clover Amour |
Notions | Yarn needle, stitch marker, scissors, pom pom (optional) |
Challenge Level | Intermediate: Confident experience with crochet. Techniques include post stitches for cables, working in continuous rounds, and decreasing. |
Gauge | Body 4” (10cm) worked in single crochet using size I/9 (5.5mm) hook: 16 sts, 20 rounds Ribbing 4” (10cm) worked in single crochet in the back loops using size H/8 (5mm) hook: 24 sts, 19 rows |
Notes |
|
Sizes
Beanie Circumference | To Fit Head Circumference | Yardage (Meters) | |
XS | 16” (41 cm) | 18” (46 cm) | 145 (132) |
S | 18” (46 cm) | 20” (51 cm) | 213 (195) |
M | 20” (51 cm) | 22” (56 cm) | 242 (221) |
L | 22” (56 cm) | 24” (61 cm) | 328 (300) |
XL | 24” (61 cm) | 26” (66 cm) | 360 (329) |
Need help? There's a tutorial video!
Abbreviations & Stitch Information
BLO | Back loop only *Crochet stitches have 2 loops on top that form a “V” shape. The back loop is the one farthest away from you. |
BOR | Beginning of round |
Ch(s) | Chain(s) |
Ctr | Center |
Dc | Double crochet |
Ea | Each |
Hk | Hook |
Lp(s) | Loop(s) |
Rem | Remaining |
Rnd | Round |
RS | Right side |
Sc | Single crochet |
Sk(d) | Skip(ped) |
Sl st | Slip stitch |
SM | Stitch marker |
St(s) | Stitch(es) |
Tr | Treble crochet |
WS | Wrong side |
Yo | Yarn over |
FPdc | Front post double crochet: Yo, insert hk from front to back to front around post of stitch indicated, yo, draw up a lp, [yo, draw through 2 lps on hk] twice, sk st directly behind FPdc on current row/rnd. (counts as 1 st) |
FPdc2tog | Front post double crochet two together: Used to decrease: yo, insert hk around post of st, yo, draw up a lp, yo, draw through 2 lps on hk, rep from once more around post of next st (3 lps on hk), yo, draw through all lps on hk. (counts as 1 st) |
FPtr | Front post treble crochet: Yo twice, insert hk from front to back to front around post of stitch indicated, yo, draw up a lp, [yo, draw through 2 lps on hk] three times, sk st directly behind FPtr on current row/rnd. (counts as 1 st) |
Sc2tog | Single crochet two together: Used to decrease: insert hk into st, yo, draw up a lp, rep from once more in next st (3 lps on hk), yo, draw through all lps on hk. (counts as 1 st) |
Cable
Notes |
|
Cable 1 | 3 sc, 2 FPdc, sc, 2 FPdc. |
Cable 3 | 3 sc, 4 FPdc, sc. |
Cable 5 | Sc, sk next two FPdc, 2 FPtr, working in front of sts just made 2 FPdc around skd FPdc, 3 sc. |
Cable 7 | 2 FPdc, sc, 2 FPdc, 3 sc. |
Cable 9 | Rep Cable 7. |
Cable 11 | Sc, 4 FPdc, 3 sc. |
Cable 13 | 3 sc, sk next two FPdc, 2 FPdc, working in front of sts just made 2 FPtr around skd FPdc, sc. |
Cable 15 | Rep Cable 1. |


Notes
Ribbing will be worked in rows then joined to form the circumference of the hat.
The body is worked in continuous rounds without turning; you will always work on the right side.
When you see instructions like “4 dc”, that means to work one dc into each of the next 4 sts.
Stitch counts are given at ends of decrease and establishment rows/rounds only and will be inside <>.
Except for Rnd 2, all front post stitches (FPdc, FPtr, etc.) are worked around the next unworked post st.
Remember to skip the single crochets behind any post stitches.
For example, if you work 2 FPdc, you will skip 2 sc behind them.
If you work 2 FPdc followed by 2 FPtr, you will skip 4 sc (2 for the FPdc and 2 for the FPtr).
Pattern Instructions
Want to read more?
Subscribe to cockycrocheter.com to keep reading this exclusive post.
